配置类代替applicationContext
用到的注解
@Configuration:指定当前类为配置类。
注意:当配置类作为AnnotationConfigApplicationContext创建的参数时,该注解可以不加,不作为参数的时候要加上。
@ComponentScan:指定要扫描的包。
注意:扫描包时,先看类上有没有注解,没有就不会继续扫描该类。
@Bean:标注在方法上,表示将方法返回值存入IoC容器,name属性指定beanid,默认值为方法名。
使用注解配置方法时,如果方法有参数,spring会去容器中查找是否有可用bean对象,原理和Autowired一样。
@Scope:单例/多例
@Import(xxx.class):导入其他配置类
@PropertySource:指定properties文件位置
新建配置类SpringConfiguration
在类上标明@Configuration注解表示这是一个配置类
同时标明@ComponentScan(“com.czw”)指定要扫描的包,等同于
1 | <context:component-scan base-package="com.czw"></context:component-scan> |
数据源配置
1 | <bean id="dataSource" class="com.alibaba.druid.pool.DruidDataSource"> |
2 | <property name="driverClassName" value="${driverClassName}"/> |
3 | <property name="url" value="${url}"/> |
4 | <property name="username" value="${username}"/> |
5 | <property name="password" value="${password}"/> |
6 | </bean> |
这一段在配置类中的体现为
1 | (name="dataSource")//给bean对象命名 |
2 | public DataSource createDDS(){ |
3 | DruidDataSource dds=new DruidDataSource(); |
4 | dds.setDriverClassName("com.mysql.cj.jdbc.Driver"); |
5 | dds.setUrl("jdbc:mysql://localhost:3306/learningssm?serverTimezone=UTC"); |
6 | dds.setUsername("root"); |
7 | dds.setPassword("root"); |
8 | return dds; |
9 | } |
new一个DataSource实现类,DruidDataSource的父类DruidAbstractDataSource实现了这一接口。set方法对应了property标签,所以用set方法赋值,然后返回,返回值将作为bean对象注入IoC容器。
SqlSessionFactoryBean
1 | <bean id="sqlSessionFactoryBean" class="org.mybatis.spring.SqlSessionFactoryBean"> |
2 | <property name="configLocation" value="classpath:mybatis-config.xml"></property> |
3 | <property name="dataSource" ref="dataSource"></property> |
4 | <property name="mapperLocations" value="classpath:mapper/*.xml"></property> |
5 | </bean> |
同样使用刚刚的方法
1 | (name="sqlSessionFactoryBean") |
2 | public SqlSessionFactoryBean createSSFB(DataSource dataSource) throws Exception{ |
3 | ApplicationContext ac= new ClassPathXmlApplicationContext("applicationContext.xml"); |
4 | SqlSessionFactoryBean ssfb=new SqlSessionFactoryBean(); |
5 | ssfb.setDataSource(dataSource); |
6 | Resource[] mapper=ac.getResources("classpath:mapper/*.xml"); |
7 | Resource mybatis=ac.getResource("classpath:mybatis-config.xml"); |
8 | ssfb.setConfigLocation(mybatis); |
9 | ssfb.setMapperLocations(mapper); |
10 | return ssfb; |
11 | } |
在这里要注意的是,这里有一个参数dataSource,spring会在IoC容器中找对应的bean,就是刚刚配的dataSource,然后ConfigLocation需要一个Resource类型的参数,而MapperLocations需要一个Resources[]类型的参数,这里先获取IoC容器,调用其中的getResource和getResources方法获取,get方法的参数对应property标签的value,即类路径。
接口实现
1 | <bean class="org.mybatis.spring.mapper.MapperScannerConfigurer"> |
2 | <property name="basePackage" value="com.czw.mapper"></property> |
3 | </bean> |
同上,不过介绍
1 | |
2 | public MapperScannerConfigurer createMSC(){ |
3 | MapperScannerConfigurer msc=new MapperScannerConfigurer(); |
4 | msc.setBasePackage("com.czw.mapper"); |
5 | return msc; |
6 | } |
最后的替换
xml配置文件使用的是ClassPathXmlApplicationContext来实现
1 | ApplicationContext ac= new ClassPathXmlApplicationContext("applicationContext.xml"); |
配置类需要使用AnnotationConfigApplicationContext,参数为配置类.class
1 | ApplicationContext ac=new AnnotationConfigApplicationContext(SpringConfiguration.class); |
优化
单独拿出数据库连接的参数,将参数用键值对形式保存至xxx.properties文件,在配置类上添加@PropertySource(“classpath:xxx.properties”),然后添加几个变量分别用@value(“${key}”)绑定好,然后就可以用变量替换方法里的字符串。
我试了,取出来为null,GG
Junit
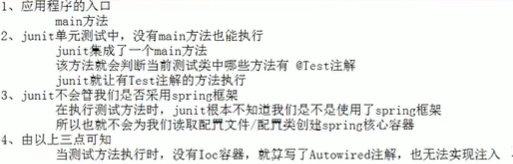
导入spring-test
使用junit的@Runwith注解让spring接管test
1 | (SpringJUnit4ClassRunner.class) |
使用@ContextConfiguration注解告知spring的IoC创建是xml还是注解
loactions指定xml文件位置,classes指定配置类
1 | (classes = SpringConfiguration.class) |
2 | @ContextConfiguration(locations = "classpath:applicationContext.xml") |
然后就可以用@Autowired注入了
注意:要求Junit版本为4.12以上,而且貌似junit5里面@Runwith换成@ExtendWith(StoryExtension.class)
最后的最后
头发-1